What you'll learn from this document:
- Getting started
- Uploading your Invoice to Galley
- Matching Location and Vendor
- Matching Invoice Items
- Managing and approving the invoice
- Applying Invoice Rules
- Keep Track of the changes
- Finishing Invoice lifecycle
- Walkthrough Tutorials
1. Get to know the Invoice Flow
Initial Configuration
To configure the view of your Galley Invoices, we recommend adding the following columns to your Invoice view. This initial configuration step is optional but recommended.
To modify your Invoice view, click "Purchase Orders" on the left-side menu, click "View Invoices", and finally, click the "+" on the right side of the column header. The columns we recommend you add, in the order we recommend you add them, are:
- Location
- Vendor
- Invoice Date
- Value
- Modified
- Creation Date
- Source
- Rules Applied
- Status
Doing this will configure your Invoice view identically to the videos below.
Besides that, you'll need to grant permissions to the users based on the following rules:
- Invoice configurations are available to Admin users on the Company Settings page
- View Invoices: View the Invoice catalog and the Invoice header in the Invoice Page
- Approve Invoices: Approve invoices that have Matching Complete state
- Create Invoices: Create a manual invoice
- Edit Invoices: Edit invoice header data, change invoice status
- View Invoice Items: View invoice items on the Invoice page
- Edit Invoice Items: Edit invoice items and all their data, match invoice items, ignore invoice items
- Edit Vendor: Create a new Vendor Item in the matching step, and create a new unit in the matching step
Basics on how to navigate the Invoice module
Watch the video below to take a look at Galley's interface for Invoices.
Invoice Flow
There are three steps to the Invoice manager workflow, listed below and then illustrated with flowcharts.
- Input Invoice: Getting your invoice into Galley is the first thing to do if you're using Galley's Invoice Module. Learn how to in Chapter 2. You have 3 different options to input your invoices:
- Scanning: Scan a PDF or image file from your invoices by uploading or sending them through email.
- EDI: Galley supports EDI integration with your vendors. With this, your invoices can flow directly from the vendor to your Galley account.
- This depends on the vendor and has an implementation process. Talk to your CSM to know more about the process.
- Manual input: You can also manually create an invoice in your Galley account. The manual process is a good way to input small or last-minute invoices.
- Invoice Matching & Approval:
- Data Matching: If enabled, the next step is to automatically match your data in Galley to the Invoice data, starting with the Location, then Vendor, and finally Vendor Items.
If needed, you will be asked to review one or more matchings manually—more information is in Chapter 3 and Chapter 4, below. - Approval: After the data in the invoice is matched to your Galley data, you may approve the invoice, triggering the Processing rules that you have configured.
- Data Matching: If enabled, the next step is to automatically match your data in Galley to the Invoice data, starting with the Location, then Vendor, and finally Vendor Items.
- Invoice Routing & Updates
- Apply Processing Rules: After the invoice is approved, you can use that data to:
- Update vendor item costs for reporting and recipe costing purposes;
- Receive the items in the invoice, adding them to your inventory.
- Manage post-receiving flows: After receiving the invoices, you may have flows outside of Galley (e.g., payment). You can use invoice statuses to help track those flows.
- Apply Processing Rules: After the invoice is approved, you can use that data to:

Configuring your Invoice Rules
If you're an admin user in Galley, you'll find a new section under your company settings page to configure your Invoice Rules. To get to your company settings page, either click the link in the previous sentence or click the Profile link (your initial in the top-right of the Galley screen) and click "Settings", then click the "Invoice Rules" tab.
There are three different rules to manage:
- Auto-update vendor item costs: Update vendor item historical data based on invoice costs.
- This rule is enabled based on Location and Vendor, for example: "Update costs for All Locations and All Vendors"; "Update costs for All Locations if the vendor is Vendor A"; or "Update costs for Location X, any Vendor".
- Using this, the vendor items will have their costs updated after the invoice is approved, changing their historical data
Notes:
- This will also change the Recipe's current cost if the vendor item is the selected one for one or more recipe ingredients, and the cost in the invoice item becomes the current cost of the vendor item.
- Example: You have a recipe for Chopped Onions where the main ingredient, Onion, has, as the main Vendor Item, White Onion from Galley Vendor.
- The current cost of White Onion is USD2.00/lb. Since Chopped Onions uses 4lb of Onions to produce 3lb of its finished good, Chopped Onions cost is USD8.00/3lb
- If you receive a new invoice from yesterday and White Onion is now USD1.50/lb, since you don't have a more recent cost for it, Onion will now have a USD1.50/lb, changing the cost of Chopped Onions to USD6.00/3lb
- This will not change the Recipe's historical cost.
- Example: Continuing the example above, you now received an invoice for White Onion at USD2.50/lb, but the invoice date is one month ago.
- In that case, since USD1.50/lb is the most recent cost, the Recipe's current cost will not change.
- That said, Recipes do keep their historical data so, if you keep your invoices up to date in Galley, your invoices WILL help you maintain an accurate Recipe historical cost!
- Auto-receive items: Add items in the invoice to your inventory once the invoice is approved.
- Similar to the auto-update vendor rule, this rule is enabled based on Location and Vendor, for example: "Update costs for All Locations and All Vendors"; "Update costs for All Locations if the vendor is Vendor A"; or "Update costs for Location X, any Vendor".
- Auto-approve all matched invoices: It is possible to auto-approve invoices that come in as a 100% match to your Galley data.
- This rule is based on a default rule, e.g., "Auto-approve all invoices on my company.", plus exceptions based on Location and Vendor.
- Note: Invoices that require manual review must also be manually approved, even if this rule is enabled.
Here's a video on how to do it (part 1):
Here's a video on how to do it (part 2):
2. How do I ingest my invoices into Galley?
The first step to managing your invoices in Galley is to ingest them into the system. You have three different ways to ingest an invoice into Galley.
(Each of the options below is explained more fully further down in this document.)
- EDI Integration: If your Vendor or internal invoice system supports EDI integration, we can add new invoices you receive directly into Galley via EDI.
- Upload image: Send your invoices to a specific email address associated with the Location receiving the items. In Galley, we use computer vision (scanning) to match invoice images (or PDFs) to your data.
- Best practice is to send each invoice in a separate email. If the invoice has multiple images (for example, the invoice is multiple pages and you take a picture of each one), attach all images related to one invoice in one email.
- Manual: Creating invoices manually (by doing data entry) in Galley is possible.
Which invoice document should I use for invoice ingestion?
Galley already has your Purchase Orders in the system, so your next step will be to upload the Final Invoice to Galley. The ideal invoice to be uploaded into Galley will be the invoice you'll use to pay your vendors (but you may use the partial invoice (or packing slip) that comes when the items are delivered).
Upload invoices through EDI
Each EDI integration is unique and setting it up will require a joint effort between you, Galley, and your vendor(s). Please contact Galley's Customer Success team to help you set up the EDI integration.
Once the EDI integration is ready, Galley can ingest new invoices within 1 hour after the source system receives them electronically from the vendor. The invoices will automatically appear on the Invoices page in your Galley account.
Invoice scanning through images or documents
If you want to use invoice scanning, contact the Galley Customer Success team, and we'll help you get set up.
Once your account is ready, you will:
- Be able to upload images to your Galley account using the Upload Invoice button on your Invoices catalog.
- Receive a list of email addresses to which to send your invoices. Each Location in your company will have a unique email address you can send to your vendors.
After the invoice is sent, you will see it in your Galley account in (up to) 24 hours.
Creating a manual invoice in Galley
If you need to, you can create your invoice manually in Galley.
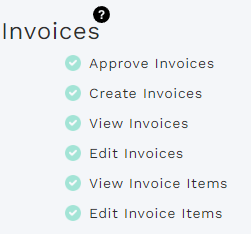
To be able to create a manual invoice, you first need to have permission to do so. To check if you have the correct permissions, go to your profile page and find if you have the permissions below. If they're checked (as in the screenshot below), you're all set. If any are missing, talk with your local Galley administrator.
Once all the permissions are set, check the video below to learn how to create new invoices:
Notes on manual invoices:
- You need to have the Vendor data and vendor items in Galley in order to create the invoice and add items to it. If you see that one or more vendor items do not exist in Galley, first go to your Vendor's page and create the item, then go back to the invoice to add.
- Any invoice created manually will be automatically matched to the data and will be marked as ready for approval.
3. How does Galley match my Location and vendors in the invoice?
You'll need to set up some information to ensure a smooth process when uploading and matching your invoices in Galley:
Matching the Location
The first step is to go to your Locations page and ensure all locations receiving invoices have a unique External ID filled out in the External ID field. Galley will use this ID to match the Location on all your invoices, regardless if they are uploaded through EDI, scanning, or manually.
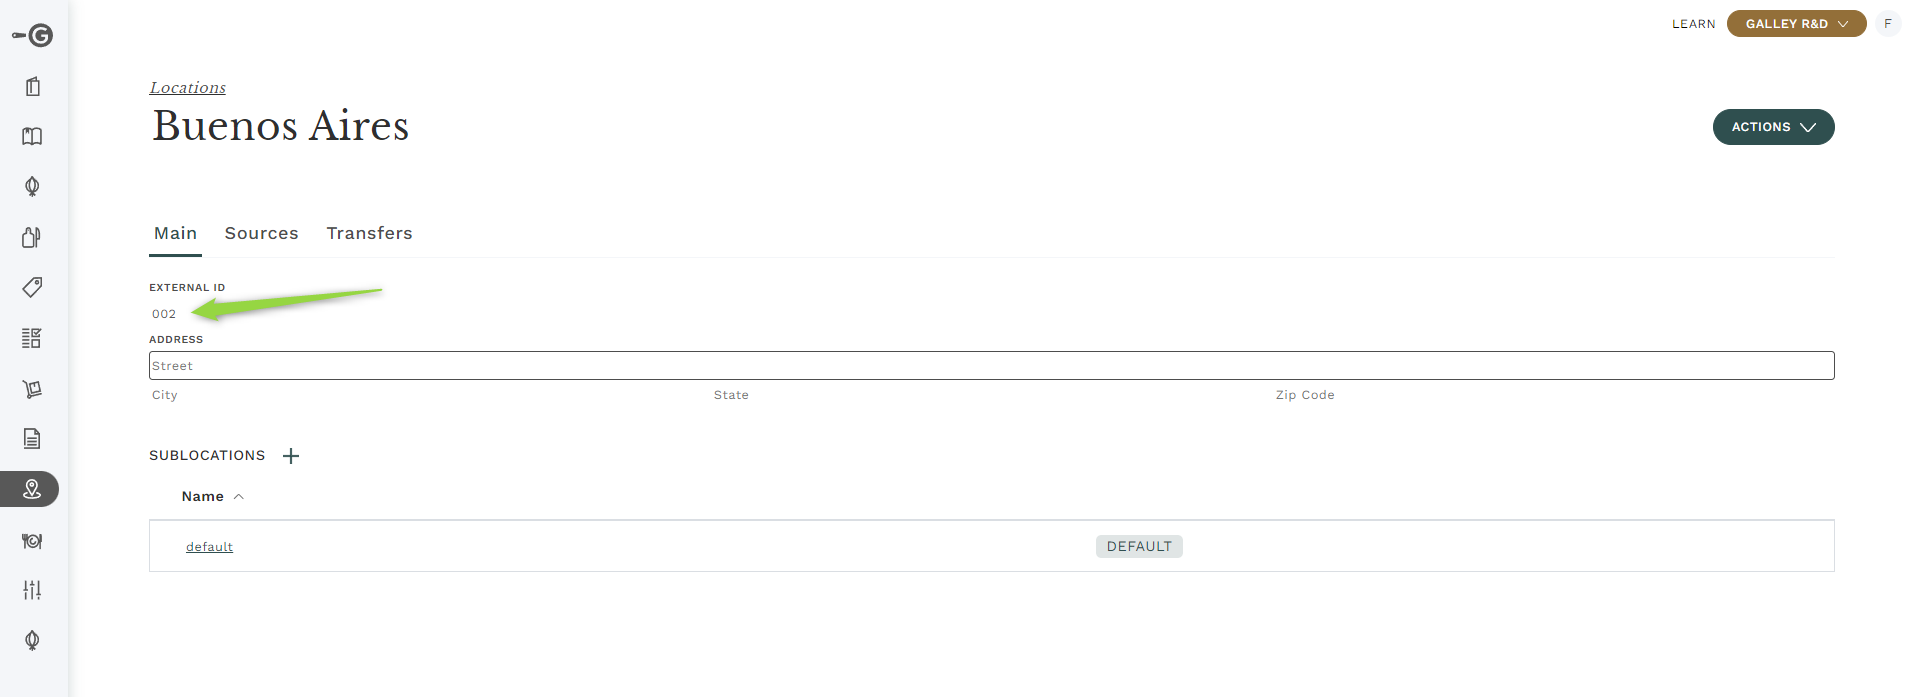
This information can also be used to integrate your Locations to external systems by adding the matching External ID to those systems.
Matching the Vendor
Once the Location is matched, Galley's Machine Learning finds the Vendor for each new invoice using the Vendor's name. The Vendor is automatically matched to the Invoice if the system encounters a 100% match. Otherwise, Galley will generate suggestions based on the closest match, and the user must match manually.
4. How do I ensure my invoice items match the correct vendor items?
After the Location and Vendor are matched, Galley starts matching the vendor items. For each invoice item, Galley's Machine Learning matches the items within the invoice to a vendor item in Galley by checking three different aspects:
- Item name
- SKU
- Unit
If Galley is not able to match one or more aspects of the item, it will require a manual review, which you can do on the Invoice page.
5. What can I do with my invoice?
Invoice Statuses
Understanding the various statuses your invoice can have is essential, as each status comes with specific restrictions and implications.
Draft: When an invoice is first added to Galley, it is assigned a Draft status and begins the matching process (if configured). If data matching is not enabled for your account, the invoice will remain in this status. Should data matching be enabled, invoices that linger in Draft status for more than one hour may indicate a data issue preventing Galley from proceeding with the matching process. If you notice invoices stuck in this status for over an hour, please reach out to Galley Support.
- **Matching Started**: This status indicates that Galley is currently in the process of matching your invoice data to the corresponding Galley data. The matching process is still ongoing at this stage.
- **Matching Complete**: This is the ideal status for a new invoice. Invoices that reach this status have successfully matched all their data with your Galley information. When an invoice is in this state, you can edit its details as outlined in the following sections.
- **Matching Requires Review**: If an invoice is marked with this status, it indicates that a problem occurred during the matching process. This could be due to issues with either vendor matching or the matching of vendor items. To resolve this, you will need to access the invoice page and manually address the discrepancies, as explained in Chapter 4.
- **Matching Failed**: This status signifies that something went wrong during the data matching process, and Galley will make another attempt to match the data. If any invoice remains in this status for over an hour, please contact Galley Support for assistance.
- **Approved**: Once an invoice is marked as Approved, no further edits can be made. This status initiates workflows for receiving items and updating costs accordingly.
- **Completed**: This status can be applied to indicate that an invoice is finalized. Transitioning an invoice to this status is done manually and does not trigger any workflows, making it suitable for marking invoices that have been paid, accounted for, or for any other custom purpose.
- **Archived**: Invoices can be archived regardless of their current status. Once archived, invoices are removed from active workflows, and no further actions can be taken on them.
- **Duplicated**: If multiple invoices are received with the same Invoice Number and Vendor, Galley will recognize the first invoice and mark any subsequent duplicates as Duplicated. These duplicated invoices will not participate in data matching, cost updates, or item receiving.
Editable data
You can modify the data in your invoice when it is in "Matching Requires Review" status or "Matching Complete" status. Once the invoice is Approved, you cannot change it. Galley tracks changes in the invoice, so it is possible to audit any changes.
Let's review which data you can change in your invoice:
- General data: You can change the Invoice date, Address, and Notes.
- Invoice Items:
- Vendor item: Even if Galley finds a vendor item that matches the invoice item, you can manually change the matching vendor item if you want.
- Quantity, Unit, and Price: After the invoice item is matched to a vendor item, you can manually change the quantity, unit, and price of the item.
- Add items to the invoice: You can add an item that is not yet on the invoice by manually selecting an existing vendor item in Galley.
- Ignore item: You cannot delete any item on the invoice, but it is possible to ignore any item, so it will not be used to update costs, nor will it be received on your account.
- Invoice Status: It is possible to manually manipulate the status of your invoice. Changing invoice status can trigger actions or behaviors, as noted on the section above
6. What happens once my invoice is Approved?
Once your invoice is approved, Galley will start the Processing rules that you configured in the steps above.
All the processing happens in the background. You can review your company-specific settings by checking the "Rules applied" section on your invoice list, or in the invoice page, as shown in the images below.
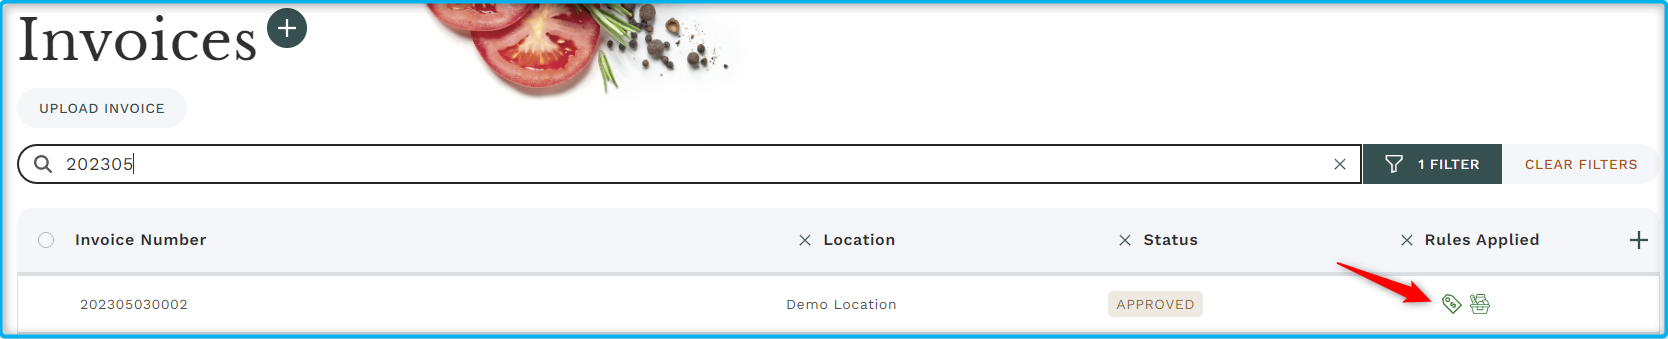
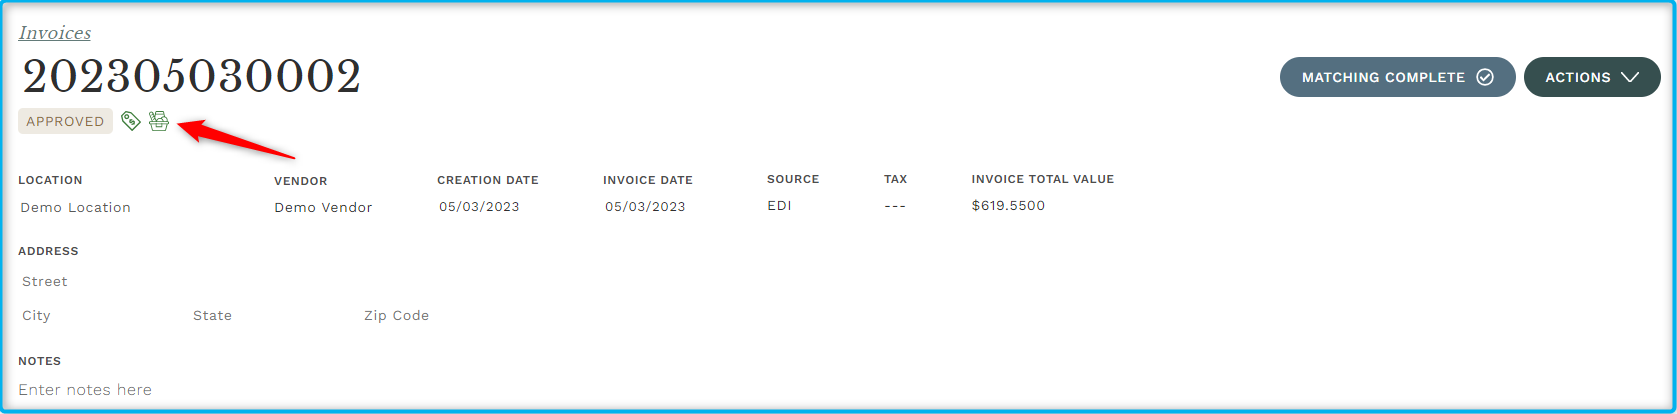
Icon Key:
- Know the icons:
 is the icon for Updating Costs
 is the icon for Receiving Items
- Know the color:
- If the icon is green, processing is done.
- If the icon is yellow, processing is running. The process can take a few minutes.
- If the icon is red, the process failed.
- In this case, Galley will try again. Contact the Galley Support team if the color doesn't change to green after 1 hour.
7. Keep Track of the changes
You can check the history of changes to an Invoice and its items! To view that:
1. In the Invoice Page, click on Actions

2. Click on History

3. Here, you can view all changes made to the invoice, who did it, when, and what changed!

8. Now what?
After your invoices are approved and processing rules have been applied, you can follow any process you have specific to your company. Remember, you can use your "Invoice Completed" and "Archived" statuses for better control and reporting!
9. Walkthrough Tutorials
Now that you understand the theory behind managing your Invoices, please view the following tutorials in the app.
Managing invoices
Here's an interactive tutorial
** Best experienced in Full Screen (click the icon in the top right corner before you begin) **
Manual Matching
Here's an interactive tutorial
** Best experienced in Full Screen (click the icon in the top right corner before you begin) **