You can integrate your preferred AI Assistant into your Galley account! Your assistant can then help you do discovery on the API or even query and edit your Galley data directly. Ask questions like "How can I query the nutritional values of one serving of a recipe?" or "What ingredients needed to make Galley Burger are currently out of stock?"
Table of Contents
There are two paths to integrate your AI Assistant to Galley via the MCP. Which route you go depends on what you need.
- Remote MCP (recommended): This is the easiest way to use Galley's MCP. With this option, you will be able to ask your AI assistant questions about your Galley data and Galley's API.
- MCP with Docker: This option is more robust and customizable. By using a Docker container, you can configure your agents access, such as whether it should be able to edit your Galley data directly, and create operation files of your own.
Remote MCP
Claude Code
With Claude Code installed, in a terminal window run:
claude mcp add --scope user --transport http galley https://mcp.galleysolutions.com/mcp
Then, open Claude Code in your terminal using claude and run /mcp
Select galley from the list
Select authenticate and log in to your Galley account
Claude Desktop
Open Claude Desktop
Open Settings
Select Connectors
Click Add custom connection
Enter galley as the name and https://mcp.galleysolutions.com/mcp as the URL

Click Connect and log in to your Galley account

MCP with Docker
Install Docker
The Galley MCP is available via a Docker container. To access it, you must first install Docker to your machine.
MacOS
Option 1: Docker Desktop (Recommended)
- Download Docker Desktop from https://www.docker.com/products/docker-desktop.
- Install the
.dmgfile - Launch Docker Desktop from Applications
- Verify installation:
docker --version
Option 2: Homebrew
# Install Homebrew if not already installed
/bin/bash -c "$(curl -fsSL https://raw.githubusercontent.com/Homebrew/install/HEAD/install.sh)"

# Install Docker
brew install --cask docker

# Launch Docker Desktop
open /Applications/Docker.app

# Verify installation
docker --version
Linux (Ubuntu/Debian)
# Update package index
sudo apt-get update

# Install required packages
sudo apt-get install ca-certificates curl gnupg lsb-release

# Add Docker's official GPG key
sudo mkdir -p /etc/apt/keyrings
curl -fsSL https://download.docker.com/linux/ubuntu/gpg | sudo gpg --dearmor -o /etc/apt/keyrings/docker.gpg

# Add Docker repository
echo \
"deb [arch=$(dpkg --print-architecture) signed-by=/etc/apt/keyrings/docker.gpg] https://download.docker.com/linux/ubuntu \
$(lsb_release -cs) stable" | sudo tee /etc/apt/sources.list.d/docker.list > /dev/null

# Install Docker Engine
sudo apt-get update
sudo apt-get install docker-ce docker-ce-cli containerd.io docker-compose-plugin

# Add your user to docker group (optional, to run without sudo)
sudo usermod -aG docker $USER
newgrp docker

# Verify installation
docker --version
Windows
Docker Desktop
- Download Docker Desktop from https://www.docker.com/products/docker-desktop.
- Run the installer
- Restart your computer when prompted
- Launch Docker Desktop
- Verify installation:
docker --version
MCP Client Integration
With Docker installed, you can configure your desktop AI agent to be a client of the Galley MCP.
Claude Desktop
- Install Claude Desktop from https://claude.ai/download
- Configure MCP Server in Claude's settings:
{
"mcpServers": {
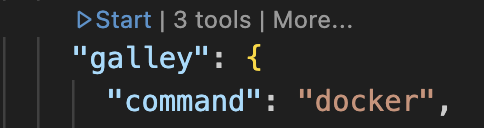
"galley": {
"command": "docker",
"args": [
"run",
"--pull",
"always",
"--rm",
"--init",
"--stop-timeout", "5",
"-i",
"-e", "X_API_KEY=your_api_key_here",
"-e", "ALLOW_MUTATIONS=none",
"-e", "STAGING=false",
"-e", "DISABLE_INTROSPECTION=false",
"public.ecr.aws/o0r1r5q2/galley-mcp:latest"
],
"env": {}
}
}
}
- Add your API Key to the arguments, replacing your_api_key_here
- Restart Claude Desktop to load the MCP server
Claude Code
- Install Claude Code from https://docs.anthropic.com/en/docs/claude-code
- Add the following to your ~/.claude/settings.json file:
{
    "mcpServers": {
      "galley": {
        "command": "docker",
        "args": [
          "run",
          "--pull", "always",
          "--rm",
          "--init",
          "--stop-timeout", "5",
          "-i",
          "-e", "X_API_KEY=your_api_key_here",
          "-e", "ALLOW_MUTATIONS=none",
          "-e", "STAGING=false",
          "-e", "DISABLE_INTROSPECTION=false",
          "public.ecr.aws/o0r1r5q2/galley-mcp:latest"
        ],
        "env": {}
      }
    }
  }
- Add your API Key to the configuration, replacing your_api_key_here. If using a read-only API key, update the argument name from X_API_KEY to X_USER_API_KEY
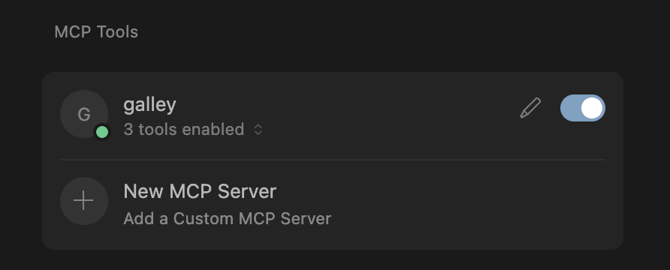
- Verify the MCP server by opening Claude Code in your terminal using claude and running
/mcp. Select galley from the list to confirm it is connected.
VS Code
- Install VS Code from https://code.visualstudio.com.
- Install MCP Extension:
- Open Extensions panel (
Ctrl+Shift+X) - Search for "Model Context Protocol"
- Install the MCP extension
- Open Extensions panel (
- Configure MCP Server:
- Open VS Code settings (
Ctrl+,) - Search for "MCP"
- Click edit in settings.json
- Copy and paste the following:
- Open VS Code settings (
{
  "mcp": {
    "servers": {
      "galley": {
        "command": "docker",
        "args": [
          "run",
          "--pull", "always",
          "--rm",
          "--init",
          "--stop-timeout", "5",
          "-i",
          "-e", "X_API_KEY=your_api_key_here",
          "-e", "ALLOW_MUTATIONS=none",
          "-e", "STAGING=false",
          "-e", "DISABLE_INTROSPECTION=false",
          "public.ecr.aws/o0r1r5q2/galley-mcp:latest"
        ]
      }
    }
  }
}
- Add your API Key to the arguments, replacing your_api_key_here
- Click Start inline in the settings.json file
Cursor IDE
- Install Cursor from https://cursor.sh.
- Add MCP Configuration in Cursor settings:
- Open Settings → Extensions → MCP
- Add new server configuration:
{
  "mcpServers": {
    "galley": {
      "command": "docker",
      "args": [
        "run",
        "--pull",
        "always",
        "--rm",
        "--init",
        "--stop-timeout", "5",
        "-i",
        "-e", "X_API_KEY=your_api_key_here",
        "-e", "ALLOW_MUTATIONS=none",
        "-e", "STAGING=false",
        "-e", "DISABLE_INTROSPECTION=false",
        "public.ecr.aws/o0r1r5q2/galley-mcp:latest"
      ],
      "env": {}
    }
  }
}
- Add your API Key to the arguments, replacing your_api_key_here. If your API key is read-only, you will also need to update the name of the argument from
X_API_KEYtoX_USER_API_KEY. - Enable the MCP server in Cursor's MCP panel
Adjust MCP Configuration
You can adjust the arguments in the provided JSON to affect your agent's access.
Staging vs Production
Without adjusting the JSON provided above your AI agent will have access to production data. To point it at staging, adjust "STAGING=false" to be "STAGING=true".
Enable/Disable Mutations
Mutations are disabled by default. You can adjust if you would like your AI agent to be able to create, update, and delete your Galley data.
Changes by an AI agent cannot be undone in the same way that changes in-app or via the API cannot be undone.
None
This is the default. No mutations can be run - read-only access. "ALLOW_MUTATIONS=none"
Explicit
Allow only pre-defined mutations from operation files (explained below), but don't allow the LLM to build new mutations dynamically. "ALLOW_MUTATIONS=explicit"
All
Allow the LLM to build and execute mutations dynamically. "ALLOW_MUTATIONS=all"
AI agents are non-deterministic and may make unexpected changes. Please use this setting with extreme caution. Allowing all mutations is not recommended in most cases.
Enable/Disable Introspection
Introspection is the ability of an AI agent to examine and understand its own computational context, available tools, and potential interactions dynamically. When introspecting, an AI agent can perform operations that are not pre-defined in operation files (explained below). Disabling introspection can be preferred by users who would like extra guardrails on their AI agent or to limit their AI token usage. To disable introspection, set "DISABLE_INTROSPECTION=true".
Operation Files
Operation files are graphQl documents that pre-define operations that can be run by the AI agent. When given a request, the agent will first review the available operation files to see if what they are asked to do has been defined in them. This allows the agent to run the operation more quickly, accurately, and with fewer introspections (therefore using fewer tokens).
GitHub Repo
A set of operation files are provided to the ai agents by default using a public GitHub repository. This repo has been created by users like you! If there is an operation that you would like for your agent to run, we encourage you to add to the repo to improve your and other's experience. To do so, clone the repository, add new files to the Operations folder, and submit a pull request.
Your AI agent can help with operation file creation. After running an operation where your agent needed to introspect, ask your agent: "Can you generate operation files that would allow you to run this operation without needing to introspect?"
Local Repository
If you would would like an operation to stay private or are waiting on a pull request to for the public repo to be improved and need the operation more immediately, you can also store operation files locally. To do so:
- Create a directory where you will store the graphQl documents
- Add the following as an argument to the args array in your config JSON. Do not add it as the final argument.
"-v", "your_dir_path:/custom", replacing your_dir_path with your system's path to the local directory. - Add your desired local files to the directory