
Jump to: Overview · Turn it on · Find the tab · Shared login · Add people · Locations · PINs · Timeout · Edit a person · Several people · Troubleshooting · FAQ
What are Team Members?
To set up Team Members, turn on Team Member Switching in Feature Control, mark the login your staff share as a Shared location login, and add each person's name under Settings > Team Members. After that, anyone working on the shared login picks their own name before they start.
Team members are people who work at a location but don't have their own Galley login. They pick their name on a shared login, on any computer or tablet. When someone prints a label that includes the team member name, or submits a line check, Galley records the person who was picked.
Team Members and Users are different. Use Users for people who sign in with their own email. Use Team Members for everyone who works on a shared login.
| Users | Team Members | |
|---|---|---|
| Signs in to Galley | Yes, with their own email | No. They pick their name on a shared login |
| Where you manage them | Settings > Users | Settings > Team Members |
| Locations | The locations you give them | One location each |
| PIN | Not used | Optional, set by an admin or manager |
Picking a name doesn't change what the shared login can see or do. Galley still uses the shared login's own access. The name only records who is working.
Turn on Team Members for your company
Team Members is an early-access feature, so your company turns it on in Feature Control. The feature is called Team Member Switching. If you haven't used Feature Control before, see How do I manage new feature releases and try upcoming features with Feature Control? at https://support.galleysolutions.com/how-do-i-manage-new-feature-releases-and-try-upcoming-features-with-feature-control
- Click your avatar in the top-right corner and select Settings.
- Open Feature Control. On some accounts this page is called Features and views.
- Find Team Member Switching. If it isn't listed, show early-access features first, as the Feature Control article describes.
- Enable it for your company, and confirm when Galley asks.
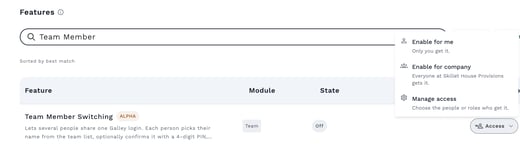
Enable Team Member Switching for the whole company, not only for yourself. The shared login and your managers need it too. If only your own login has it, the shared login won't ask anyone to pick a name.
While Team Member Switching is off, you won't see any of it:
- There is no Team Members tab in Settings.
- The Shared location login checkbox doesn't appear on a user's page.
- The {MEMBER_FULL_NAME} variable isn't offered in the label template editor.
- Nobody is asked to pick a name, and labels print the signed-in account's name.
Find the Team Members tab
- Click your avatar in the top-right corner and select Settings.
- Select Team Members. If your Settings page has a side menu, it's under People and access, right after Users.
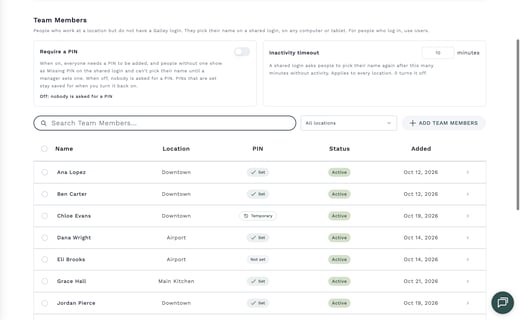
Admins see the Team Members tab. People who aren't admins see it too when they have the Manage Team Members permission. It lets them add, deactivate, reactivate and delete team members at their locations, and set or reset their PINs.
To give a manager this permission, open Settings > Roles (or the person's page under Settings > Users), and turn on Manage Team Members in the Company section.
Everyone on this tab sees only the locations they have access to. Only admins can change Require a PIN and the Inactivity timeout. A manager sees a short line instead, such as "PINs are required at Your Company. An admin sets this."
Set up the shared login
Galley asks people to pick their name only on a login you mark as a Shared location login. Mark each login that several people use.
- Open Settings > Users and select the login your staff share. To make a new one, add a new user.
- Make sure its Type is User. Admins can't be shared logins.
- Check Shared location login.
- Click Save Changes (or Create User for a new login).
- On the shared computer or tablet, reload Galley or sign in again, so the change takes effect.
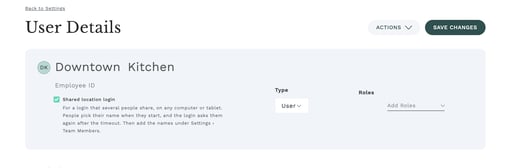
In the Users list, a Shared badge appears next to each login that is marked and has the Type User.
Give the shared login only the locations where it is used. On the shared login, people can switch between every location that login can access, so a login with access to all locations shows a long list.
Add team members
You can add one person or paste a whole list from a spreadsheet.
- On the Team Members tab, click Add Team Members.
- Under Location, choose the location where these people work. If you had filtered the table to one location, it's already chosen.
- Under Names, one per line, type a name or paste a list.
- Check the line under the names. It says how many people will be added and lists anyone already on the list.
- If Require a PIN is on, enter a 4-digit PIN for each person, or click Make up PINs for everyone.
- Click Save.
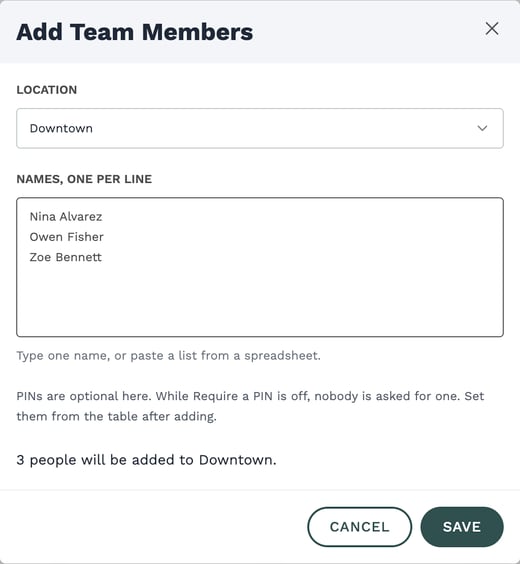
Galley confirms with a message such as "3 team members added to Downtown." Each new person shows in the table as Active, with today's date under Added.
How Galley reads the names you paste
- Blank lines are ignored, and extra spaces are trimmed.
- A name that differs only by capital letters counts as the same name.
- A name that's already at that location is skipped. If that person is inactive, the window tells you to reactivate them from the table instead.
- You can add up to 200 names at a time, and a name can be up to 255 characters.
If you add the first team members for a location while the shared login is already open, reload Galley on that computer or tablet. The names then appear.
Work with more than one location
Each team member belongs to one location. The table's Location column shows where each person works.
If you have access to more than one location, a location filter appears next to the search box. Choose All locations to see everyone, or pick one location to see just its team. When you click Add Team Members with one location chosen, that location is filled in for you. With All locations, the window starts on Choose a location, so you pick one.
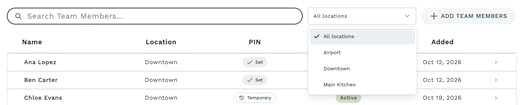
The shared login shows the names for the location it's set to. When someone changes the location on the shared login, Galley shows that location's team.
If someone works at two locations, add them at each location. Each entry is separate, with its own PIN.
Require a PIN
Require a PIN decides whether people enter a 4-digit PIN when they pick their name. It applies to the whole company, and it's off until an admin turns it on.
| Require a PIN | What happens on the shared login |
|---|---|
| Off: nobody is asked for a PIN | Everyone picks their name with one tap, including people who have a PIN. PINs you've set stay saved for when you turn it back on. |
| On: everyone needs a PIN | People with a PIN enter it to pick their name. People without one show as Missing PIN and can't pick their name until a manager sets one. Every new team member needs a PIN to be added. |
Turning Require a PIN on
- On the Team Members tab, turn on the Require a PIN switch.
- If some active people don't have a PIN, Galley asks "Turn on Require a PIN?" and tells you how many people have no PIN.
- Click Turn on.
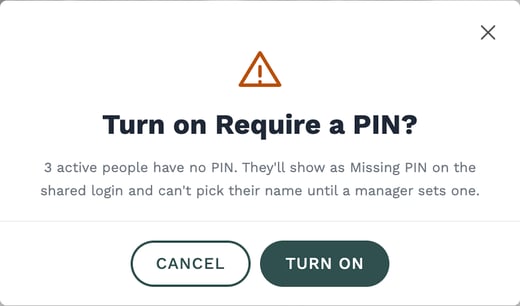
While anyone is missing a PIN, a banner above the table says how many people can't pick their name yet. Click Show only them to list just those people, then set a PIN for each one. Click Show everyone to go back to the full list.
When you turn Require a PIN on, people without a PIN can't pick their name on the shared login until you set one. Set their PINs right away, or set them before you turn it on.
What the PIN column means
| PIN | Meaning |
|---|---|
| Set | The person has a PIN they chose or you gave them. |
| Temporary | You set a PIN and asked the person to choose their own. They'll be asked to choose one the next time they pick their name. |
| Not set | No PIN yet. This is fine while Require a PIN is off. |
| Missing PIN | Require a PIN is on and this active person has no PIN, so they can't pick their name. |
| Locked | Someone entered 5 wrong PINs in a row. Reset the PIN to unlock it. |
Set the inactivity timeout
The Inactivity timeout asks people on a shared login to pick their name again after a number of minutes without activity. It applies to every location.
- On the Team Members tab, find the Inactivity timeout card.
- Type a number of minutes, from 0 to 720.
- Click away or press Enter. The setting saves by itself.

The timeout starts at 10 minutes. Enter 0 to turn it off. With the timeout off, the person picked stays picked until someone switches or logs out. A decimal, a negative number or anything over 720 isn't saved, and the field shows "Enter whole minutes from 0 to 720."
What happens when the timeout runs out
- Tapping, clicking, typing, scrolling or moving the mouse in Galley all count as activity, in any Galley tab of the shared login on that computer or tablet.
- When the time runs out, the shared login goes back to the Select a team member screen with the message "No activity for a while. Pick your name to keep going."
- Nobody is picked at any location on that computer or tablet until someone picks again. Whatever was on the screen stays underneath.
- If Galley is opened again after the timeout has passed, for example the next morning, it starts at the names, so yesterday's person is never still picked.
Only admins can change the Inactivity timeout.
Edit a team member
Select anyone in the table to open their window. The window's title is the person's name, with their location below it. Changes save as you make them, so click Close when you're done.
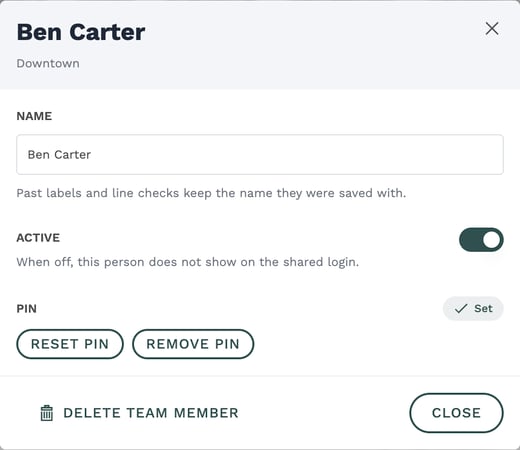
Rename someone
Change the Name field. The new name saves by itself when you click away or press Enter. Labels and line checks from before keep the name they were saved with. Two people at the same location can't have the same name. If you try, Galley says "That name is already on this list."
Turn someone active or inactive
Use the Active switch when someone is away for a while or might come back. Turning Active off takes them off the shared login but keeps them in your table, with their PIN, so you can turn them back on at any time. If someone has left for good, delete them instead.
When you turn Active off:
- The person no longer shows on the shared login, and they can't be chosen in the Who's printing? list.
- If they're picked on a shared login right now, Galley clears them the next time that login loads its list of names.
- Their PIN buttons are replaced by "Turn Active back on to set or change a PIN."
- They stay in your table as Inactive, and you can turn Active back on at any time.
Delete someone
Delete someone who has left for good. They come off the Team Members list, the Who's printing? list and the shared login. Labels and line checks they already did keep their name.
- Select the person in the table to open their window.
- Click Delete team member, at the bottom left of the window.
- Galley asks you to confirm, for example "Delete Ben Carter?". Click Delete, or Cancel to keep them.
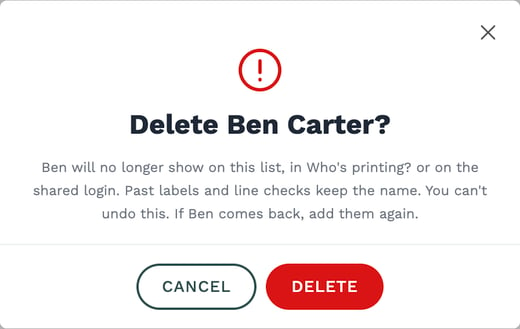
Galley confirms with a message such as "Ben Carter deleted." and the person leaves the table. You can delete people who are active or inactive.
You can't undo a delete in Galley. If the person comes back, add their name again. They come back as a new person, with no PIN until you set one.
Admins, and anyone with the Manage Team Members permission, can delete team members at the locations they have access to. A shared location login can't delete anyone.
Inactive or Delete?
If someone might come back, turn Active off. Delete is for someone who has left for good.
| Turn Active off | Delete | |
|---|---|---|
| Use it when | Someone is away for a while or might come back | Someone has left for good |
| Shared login and Who's printing? | Not shown | Not shown |
| Team Members table | Stays, marked Inactive | Removed |
| PIN | Kept | Removed |
| Past labels and line checks | Keep their name | Keep their name |
| To undo | Turn Active back on | You can't. Add the name again as a new person |
Set, reset or remove a PIN
- In the PIN section, click Set PIN (or Reset PIN if the person already has one).
- Type 4 digits in New PIN, or click Make one up.
- Leave the box checked if you want the person to choose their own PIN the first time they use it. It's checked to start with.
- Click Save PIN, then tell the person their PIN in person.
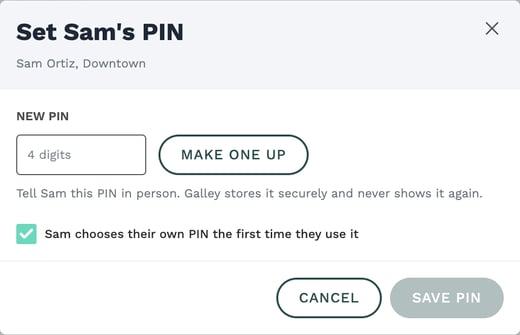
Galley stores the PIN securely and never shows it again, so you can't look it up later. If someone forgets their PIN, reset it. Saving a new PIN also unlocks a Locked name.
To take a PIN away, click Remove PIN and confirm. With Require a PIN off, the person picks their name with no PIN. With it on, they show as Missing PIN until a manager sets a new one. A removed PIN can't be brought back, but you can set a new one at any time.
Change several people at once
Tick the people you want to change, then pick an action in the footer at the bottom of the screen. You can set people active or inactive, remove their PINs, or delete them, all in one go.
Tick people
- On the Team Members tab, click the tick box at the start of each person's row. Ticking someone doesn't open their window.
- To tick everyone on the page you're looking at, click the tick box in the header row.
- A footer opens at the bottom of the screen. It shows how many people you picked, such as "3 Selected", and four actions: Set Active, Set Inactive, Remove PIN and Delete.
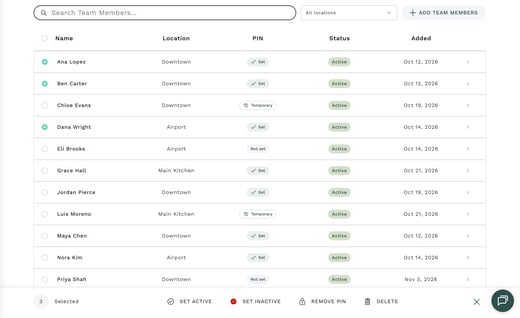
You can tick people at different locations together. Your ticks stay while you search, change the location filter or move to another page. To clear them all, click the X at the right of the footer. Reloading Galley or leaving the tab clears them too.
What each action does
| Action | What happens |
|---|---|
| Set Active | Everyone ticked is set to Active right away. People who are already active stay as they are. |
| Set Inactive | Everyone ticked is set to Inactive right away. People who are already inactive stay as they are. |
| Remove PIN | Galley asks you to confirm, then removes the PIN of everyone ticked who has one, active or inactive. People with no PIN stay as they are. |
| Delete | Galley asks you to confirm, then deletes everyone ticked. |
Galley sums up the result in one message, such as "3 people set to Inactive." or "Deleted 3 people." If some people were already as you asked, it says so, for example "2 people set to Active. 1 already was." If nobody needs to change, Galley changes nothing and tells you, for example "Everyone you picked is already active." or "Nobody you picked has a PIN."
After Set Active or Set Inactive, the people stay ticked, so you can undo with the other action. After Remove PIN or Delete, the ticks are cleared.
Confirm Remove PIN or Delete
Remove PIN and Delete ask before they change anything, and list the people they apply to. When those people work at more than one location, each name shows its location, such as "Dana Wright (Airport)".
- With people ticked, click Delete in the footer.
- Galley asks, for example, "Delete 3 people?" and lists them.
- Click Delete 3 people to confirm, or Cancel to change nothing.
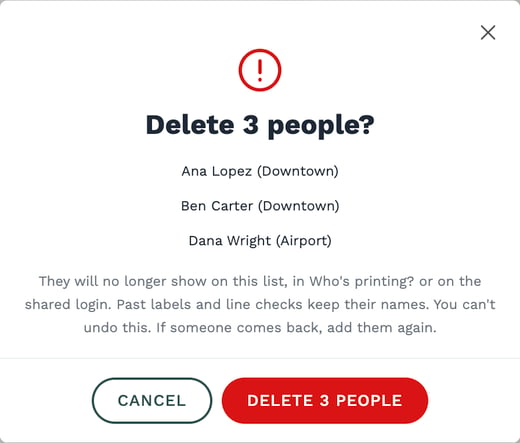
Remove PIN works the same way, with a title such as "Remove 3 PINs?". If Require a PIN is on, it reminds you that those people can't pick their name on the shared login until a manager sets a new PIN.
If Galley can't change some people, the message says where, for example "Deleted 4 people. Couldn't delete 2 people at Downtown. Try again." The people at that location stay ticked, so you can try again straight away.
Troubleshooting
I don't see the Team Members tab
Check that Team Member Switching is enabled for your company in Feature Control. If it is, you need to be an admin or have the Manage Team Members permission. Ask an admin to add it to your role.
The shared login doesn't ask anyone to pick a name
Check each of these:
- The login is marked Shared location login under Settings > Users, and its Type is User.
- The location the shared login is set to has at least one active team member.
- Galley was reloaded on that computer or tablet after you marked the login or added the location's first names.
- Team Member Switching is enabled for the whole company, not only for you.
The tab says "There are no locations to add team members to."
Your account doesn't have access to any locations yet. Ask an admin to give you access to the locations you manage.
A name was skipped when I added people
That name is already at the location. If the person is inactive, open them in the table and turn Active back on. If it's a different person with the same name, add something to tell them apart, such as "Maria Garcia B."
Someone shows Missing PIN or Locked
Open the person in the table and click Set PIN or Reset PIN. Once you save, they can pick their name again.
Galley says it couldn't delete someone
Check that you're signed in with your own login. A shared location login can't delete team members, even if it has the Manage Team Members permission. If you are on your own login, try again.
Frequently asked questions
Does a team member need an email address?
No. A team member is just a name at a location. Only the shared login needs a Galley sign-in.
Does this work on a desktop computer?
Yes. A shared login works on any computer or tablet. Each computer or tablet keeps its own picked person, so two devices on the same shared login can each have someone different picked.
Can team members add themselves?
No. An admin, or a manager with the Manage Team Members permission, adds them. On the shared login, people who aren't listed see "Not on the list? Ask a manager to add you under Settings › Team Members".
Can I delete a team member?
Yes. Open the person and click Delete team member, or tick several people and click Delete in the footer. Delete is for someone who has left for good, and you can't undo it, but you can add the same name again later as a new person. Their past labels and line checks keep their name. If someone might come back, turn their Active switch off instead.
Can I see someone's PIN?
No. Galley never shows a PIN after it's saved. If someone forgets theirs, reset it and tell them the new one.
Do I have to use PINs?
No. Require a PIN is off unless you turn it on, and while it's off nobody is asked for a PIN.