
Jump to: Overview · Before you start · Select events · Cycle count · Purchase guide · Production plan · Production list · Reports · Troubleshooting · FAQ
What you can do with advanced workflows
When you plan events in Menu Planner, you have already told Galley what you are serving, how much of it, and when. Advanced workflows let you turn that plan into the next piece of work without re-entering any of it.
You select the events you care about, then choose a workflow. Galley reads the recipes and quantities on those events and builds the count, order, plan, or export for you.
| Workflow | What it does | Where you end up |
|---|---|---|
| Cycle Count | Builds a count sheet from the items your selected events need | Opens the new cycle count so you can start counting |
| Purchase | Builds a purchase guide for the items your selected events need | Created in the background, then you are redirected or notified |
| Production* | Creates a production plan scheduled around your serving dates. Requires the Production Planning module | Created in the background, then you get a notification |
| Production List | Aggregates recipes and ingredients across your selected events so you can print or export them. Available to everyone | Stays in the window until you print, export, or close it |
| Reports | Exports cost, ingredient, and template reports for your selected events | Downloads or opens the report |
* Production and Production List are two different things, and which one you use depends on your subscription. Production creates a scheduled plan that Galley tracks for you, and it is only available if your company has the Production Planning module. Production Lists are great too!
Before you start
Four things determine whether you can run a workflow:
- Your company has the module the workflow depends on. Production plans require the Production Planning module. Cycle Count, Purchase, Production List, and Reports do not.
- Advanced workflows are turned on for your company. Each one (production, purchasing, cycle count, and reports) can be turned on or off separately.
- Your user has permission to run it. Cycle count, purchase, and production are separate permissions, so you may have some and not others.
- The events you select are ready to run.
If a button is missing entirely, that workflow is either not part of your subscription, turned off for your company, or not granted to your user. Contact your Galley administrator, who can tell you which it is.
What makes an event ready
An event is ready when it has real work in it and nothing unresolved. In practice, that means:
- It has at least one recipe with an amount-to-serve quantity set.
- It has no constraint violations.
An empty event is never ready. If any event in your selection is not ready, the workflow buttons stay greyed out.
Select the events you want to work from
Every advanced workflow starts the same way: select one or more events, then pick a workflow from the action bar that appears. There are two places you can do this, and they follow slightly different rules.
From the weekly view of a menu plan
- In the left navigation, click Menu Planner.
- Open the Plans tab and click the plan you want to work from.
- Click the events you want to include. The header at the top of the week is replaced by an action bar as soon as you select your first event.
- Click the workflow you want to run.
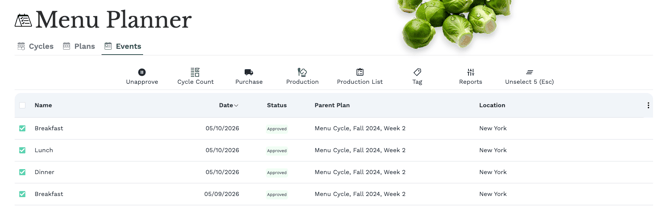
From the Events tab
- In the left navigation, click Menu Planner.
- Open the Events tab.
- Select the events you want to include. The action bar appears at the top of the list.
- Click the workflow you want to run.
| Weekly view of a plan | Events tab | |
|---|---|---|
| Best for | Working through one plan a week at a time | Pulling events together from across plans |
| Every event must be ready | Yes, the buttons stay greyed out otherwise | Checked when the workflow runs |
| All events from one location | Already true, a plan belongs to one location | Yes, you must select from a single location |

The button labelled Unselect shows how many events you currently have selected, so it doubles as a running count. You can also press Esc at any time to clear your selection.
Advanced workflows run from menu plans and from the Events tab, not from menu cycles. In the weekly view of a cycle you will only see Tag, Reports, Copy, and Delete all items. Cycles are templates, so build a plan from your cycle first, then run the workflow from the plan.
In the weekly view, the action bar fits as many buttons as your screen allows and moves the rest into a More menu. If you expected a button and cannot see it, check the More menu before assuming it is unavailable.
Run a menu-based cycle count
A cycle count built from Menu Plan Events counts only what those events actually need, so your team is not walking the whole storeroom.
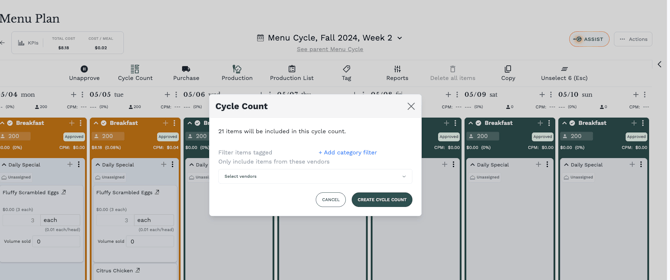
- Select your events, then click Cycle Count.
- Check the count at the top of the window. It tells you how many items will be included.
- Narrow the list if you want to. Click + Add category filter to count only items carrying a certain tag, and use the toggle to switch between Must include all and Must not include any.
- To limit the count to certain suppliers, choose them under Only include items from these vendors. Leave it empty to include every vendor.
- Click CREATE CYCLE COUNT.
Galley creates the count and takes you straight to it so you can begin counting.
If any of the items in your events have zero volume, you will see a checkbox for Include items with zero volume. It is off by default, so those items are left out. Turn it on when you want them on the count sheet anyway.
If your filters narrow the list all the way down to zero items, the CREATE CYCLE COUNT button is disabled. Loosen a filter until the count at the top is above zero.
Create a purchase guide
A purchase guide turns the items your events need into something you can order against.
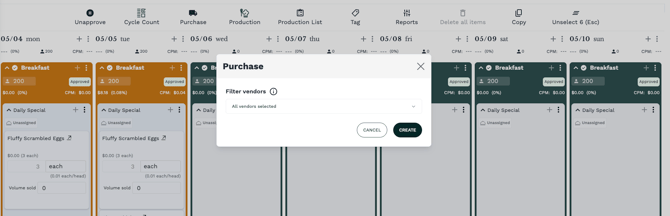
- Select your events, then click Purchase.
- Leave the vendor field as 'All vendors' selected to purchase across every vendor (recommended) , or choose specific vendors if you would rather split the order.
- If you chose specific vendors, you can switch the toggle from Primary items only to Allow alternate items. Allowing alternates lets Galley reach for a substitute item when the primary one is not carried by the vendors you picked.
- Click CREATE.
The guide is built in the background. You will see a message confirming that it is being created, and you will either be redirected to it or notified when it is ready.
Start a production plan
A production plan tells your kitchen what to make and when, working backwards from the dates your events are served. Galley keeps the plan as a record you can return to, approve, and execute against.
This workflow requires the Production Planning module. If your company does not have it, you will not see a Production button, and Production List is the workflow to use instead.
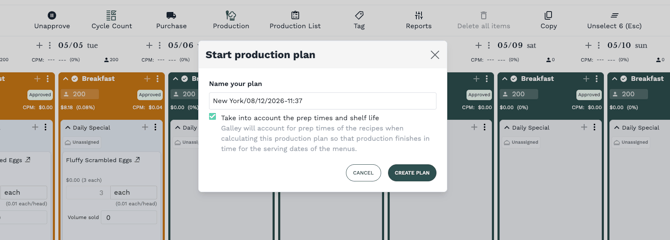
- Select your events, then click Production.
- Check the name in Name your plan. Galley suggests one built from the location, your name, and the current date and time. Change it to something your team will recognise if you prefer.
- Leave Take into account the prep times and shelf life checked so Galley schedules production to finish in time for each serving date. Clear it only if you want to ignore prep times.
- Click CREATE PLAN.
You will see a message confirming the plan is being created, and a notification once it is available.
Depending on how your account is set up, clicking Production may create the plan straight away without asking you to name it. Galley names it for you and approves it automatically. That is expected behavior, not an error.
Build and export a production list
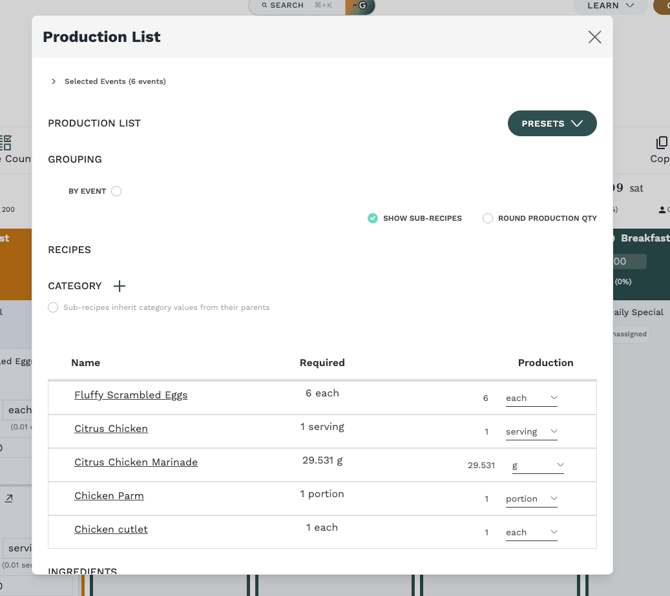
A production list pulls together every recipe and ingredient across the events you selected, adds up the quantities, and gives you something to print or view on tablets for the line.
This is the workflow to use if your company does not have the Production Planning module, and it is available to anyone with permission to produce. It gives you the quantities your kitchen needs without creating a plan for Galley to track. Teams that do have the module still use it when they want a quick working document rather than a scheduled record.
- Select your events, then click Production List.
- Review the events listed at the top so you know exactly what the numbers cover.
- Use By Event to change how the list is grouped.
- Tick Show Sub-recipes to break recipes down into their components, and Round Production Qty to round the production numbers to friendlier figures.
- Filter the Recipes and Ingredients sections by category if you only want part of the list.
- Click Next: Export.
- Choose Print / Download PDF to open a printable version, or one of the template export options if your account uses templates.
- Click Back to adjust the list, or Close when you are finished.
The Next: Export button is disabled while the list is empty. If you see no recipes or ingredients for your selected events, clear your category filters or check that the events actually have recipes on them.
Export reports from your events
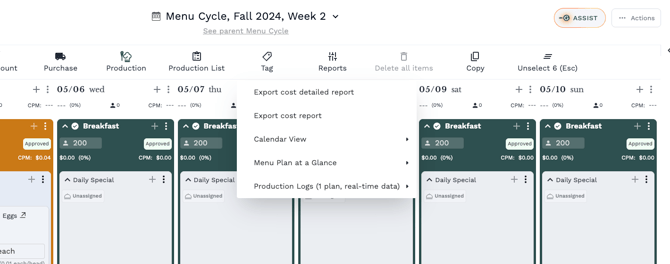
The Reports menu exports data about the events you selected rather than creating new work.
- Select your events, then click Reports.
- Pick the export you want:
- Export cost report, for a summary of cost across your selected events.
- Export cost detailed report, for the same information broken down further.
- Export ingredient list, for the ingredients your events need. This one is available from the Events tab.
- Any templates or saved reports your company has set up, listed below the exports.
Exports download to your computer. Saved reports open so you can view them.
Troubleshooting
| What you see | What it means | What to do |
|---|---|---|
| "This flow cannot be initiated because optional items are pending, constraints violations, or the events you've selected are empty. Review your options and try again." | At least one selected event is not ready to run | Open the events in your selection and check for empty events, undecided optional items, and constraint warnings. Resolve those, then reselect |
| "This flow cannot be initiated because the selected locations belong to multiple locations. Please select events from a single location." | Your selection on the Events tab spans more than one location | Narrow your selection to one location and run the workflow once per location |
| "You can't create this production plan, because the selected events need to have at least one recipe with quantities." | The events have no recipes with quantities on them | Add recipes and quantities to the events, then try again |
| "You need to select menus from the same location, your selection includes: ..." | The production plan covers more than one location | Reselect events from the single location named in the message |
| "Can't edit Approved events" | You tried to clear items from events that are already approved | Unapprove the events first if you genuinely need to change them |
| There is no Production button, but Production List is there | Your company does not have the Production Planning module | Use Production List to get your quantities. |
| Any other workflow button is missing | The workflow is off for your company, or you do not have permission | Check the More menu first, then contact your Galley administrator |
Frequently asked questions
Can I run advanced workflows from a menu cycle?
No. Cycles are templates, so they do not carry the real dates and quantities these workflows need. Build a plan from your cycle, then run the workflow from the plan or from the Events tab.
Do I have to approve events first?
No. Approving and running a workflow are separate steps, and you can run a workflow on events that are not yet approved. What matters is that the events are ready, meaning they have recipes with quantities and nothing unresolved.
Can I select events from more than one location?
Not for a single run. Cycle counts, purchase guides, production plans, and production lists are all built for one location at a time. Select the events for one location, run the workflow, then repeat for the next.
Why are fewer items on my cycle count than I expected?
Two things commonly reduce the count. Items with zero volume are excluded unless you tick Include items with zero volume, and any category or vendor filters you have applied will narrow the list further. The count at the top of the window always reflects your current filters.
What is the difference between Production and Production List?
The short answer is that Production requires the Production Planning module and Production List does not.
Production creates a scheduled production plan that Galley tracks, and it can work backwards from your serving dates using prep times and shelf life. It is only available to companies with the Production Planning module.
Production List is available to everyone with permission to produce. It adds up recipes and ingredients across your selected events so you can print or export them, without creating anything for Galley to track. If your company does not have the module, this is the flow you will use.
Where do I find something I created?
A cycle count opens as soon as it is created, so you can start counting immediately.
Purchase guides and production plans are built in the background. You will get a notification when each one is ready, and opening the notification is the quickest way to reach it. You can also find purchase guides under Orders (named Purchase Orders if that is the only order type you have access to), and production plans under Production.
I selected events but no action bar appeared. Why?
The action bar replaces the header only while events are selected. If nothing appeared, you may have selected event items rather than the events themselves. Press Esc to clear your selection and try clicking the event again.