Jump to: Overview · Recipes · Corrections · Ingredients · Your style · FAQ
What Image Generation does
Open Photo Shoot on a recipe, choose AI Assist, and Galley Assist creates a photo for each procedure step and a main image of the finished dish. Accept them, and each photo is added to its step while the finished dish becomes the recipe's main image.
Ingredients work the same way: Galley Assist creates a product photo, and once you accept it, it becomes the ingredient's primary image right away. Collections have Photo Shoot too.
Cooks see a picture for every step they follow, and your recipe and ingredient lists look consistent, without a photo shoot in the kitchen.
Always review generated images before you use them. They are created by AI and can show details that don't match your recipe exactly.
To use Photo Shoot, you need permission to edit a recipe's media. If you don't see the Photo Shoot button, ask your Galley admin.
Create step photos and a main image for a recipe
- Open the recipe and scroll to its procedure steps.
- Click the Photo Shoot button next to the steps.
- Choose Use AI Assist. (To take the photos yourself, choose Use Your Camera instead.)
- Under Generation Scope, pick what to create: All (every step plus the main image), Steps Only, or Primary Only (just the main image).
- Check the prompts. The Standard Prompt applies to every step photo, and the Primary Image Prompt applies to the main image. They start with your company's saved style, and you can change them for this recipe.
- Click Generate. The button shows how many images will be created.
Galley Assist works through the steps in order, so each picture builds on the one before. You can close Photo Shoot while it works: a badge on the button shows it's in progress, and a message tells you when the images are ready to review.
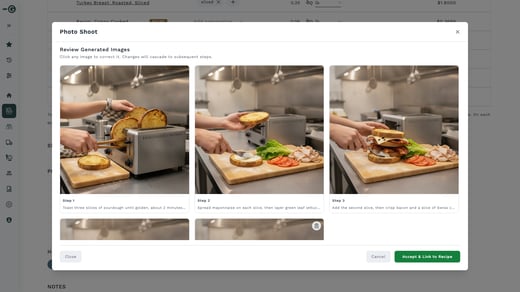
When every image is ready, review the grid. Then click Accept & Link to Recipe:
- Each step photo is added to its step.
- The finished dish becomes the recipe's main image.
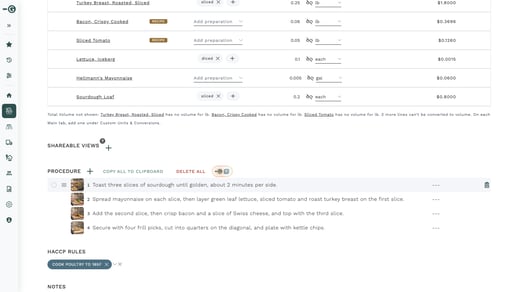
Write your steps the way a cook would read them. Clear, specific steps ("Toast the sourdough until golden") produce more accurate photos than short ones ("Toast").
Fix one image
If an image isn't quite right, you don't have to start over.
- Click the image in the review grid.
- Describe what you'd like to change, for example "Serve it on a white plate, closer crop".
- Click Regenerate This Image to redo only that image. To redo it and the steps that follow it, click the Regenerate button that shows the number of images.
Earlier versions are kept, so you can switch back to one you liked better. When you're happy with the grid, click Accept & Link to Recipe.
Create a photo for an ingredient
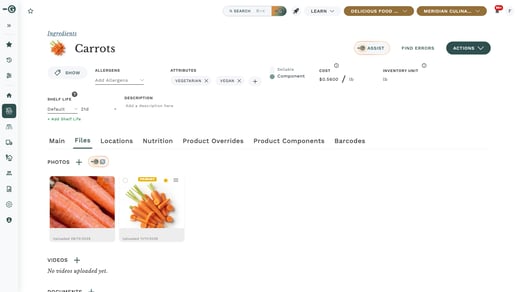
1. Open the ingredient. 2. Open the Files tab and click the Photo Shoot button next to Photos. (You can also click the ingredient's primary image and use Photo Shoot from there.) 3. If the ingredient already has a primary image, choose how to start: - Use as Reference: Galley Assist uses the current photo as a guide. - Generate Fresh: Galley Assist creates a new photo from scratch. 4. Review the photo. To change it, describe what you'd like and click Generate with Adjustments. 5. Click Accept & Link. 6. If the ingredient had a primary image, choose Keep Old Image (it stays in the ingredient's Files) or Delete Old Image.
The new photo becomes the ingredient's primary image right away.
Set your company's style
Admins can set the prompts that shape every photo your company creates, so your whole catalog has one look.
- Go to Settings and open Galley Assist.
- Under AI Image Generation Settings, edit the prompts for procedure steps, for a recipe's main image and for ingredients.
- Click Save.
These prompts apply to everyone in your company. To go back to Galley's original wording for a prompt, click Reset to Default next to it.
Changing the prompts here doesn't change photos you already created. It applies to the next Photo Shoot.
Frequently asked questions
Can I create only the main image?
Yes. Choose Primary Only under Generation Scope. It's also the only option for a recipe with no procedure steps yet.
What happens if I close Photo Shoot while images are being created?
Generation continues. Open Photo Shoot again to pick up where you left off, or click the message that appears when the images are ready.
Does accepting the images replace my recipe's current main image?
The generated image of the finished dish becomes the recipe's main image. Your previous photo stays in the recipe's Files, so you can make it the main image again at any time.
I don't see the Photo Shoot button. Why?
Photo Shoot needs permission to edit a recipe's media. Ask your Galley admin to check your role. If your company doesn't have Image Generation turned on yet, contact your Customer Success Manager.
Who can change the company prompts?
Admins, in Settings, Galley Assist.